Class Manager 2023 Developer Guide
Table of Contents
Acknowledgements
- The features
undo,redo,historyand arrow key command navigation (including the code) were reused with some changes from AddressBook-Level4. - Our book icon favicon was taken from Smashicons at Flaticon.
Setting up, getting started
Refer to the guide Setting up and getting started.
Design
Architecture

The Architecture Diagram given above explains the high-level design of the app.
Below is a quick overview of the main components and how they interact with each other.
Main components of the architecture
Main (consisting of classes Main and MainApp) is in charge of the app launch and shutdown.
- At app launch, it initialises the other components in the correct sequence and connects them up with each other.
- At shutdown, it shuts down the other components and invokes cleanup methods where necessary.
The bulk of the app's work is done by the following four components:
UI: The UI of the app.Logic: The command executor.Model: Holds the data of the app in memory.Storage: Reads data from and writes data to the hard disk.
Commons represent a collection of classes used by multiple other components.
How the architecture components interact with each other
The Sequence Diagram below shows how the components interact with each other for the scenario where the user issues the command delete s/A0249112A.

Each of the four main components (also shown in the diagram above),
- defines its API in an
interfacewith the same name as the component. - implements its functionality using a concrete
{Component Name}Managerclass (which follows the corresponding APIinterfacementioned in the previous point).
For example, the Logic component defines its API in the Logic.java interface and implements its functionality using the LogicManager.java class, which follows the Logic interface. Other components interact with a given component through its interface rather than the concrete class (reason: to prevent outside components' being coupled to the implementation of a component), as illustrated in the (partial) class diagram below.

The sections below give more details of each component.
UI component
The API of this component is specified in Ui.java

The UI consists of a MainWindow that is made up of parts e.g.CommandBox, ResultDisplay, StudentListPanel, StatusBarFooter, etc. All these, including the MainWindow, inherit from the abstract UiPart class, which captures the commonalities between classes that represent parts of the visible GUI.
The UI component uses the JavaFx UI framework. The layout of these UI parts is defined in matching .fxml files that are in the src/main/resources/view folder. For example, the layout of the MainWindow is specified in MainWindow.fxml
The UI component,
- executes user commands using the
Logiccomponent. - listens for changes to
Modeldata so that the UI can be updated with the modified data. - keeps a reference to the
Logiccomponent because theUIrelies on theLogicto execute commands. - depends on some classes in the
Modelcomponent, as it displays theStudentobject residing in theModel.
Logic component
API : Logic.java
Here's a (partial) class diagram of the Logic component:

How the Logic component works:
- When
Logicis called upon to execute a command, it is passed to aClassManagerParserobject, which in turn creates a parser that matches the command (e.g.,DeleteCommandParser) and uses it to parse the command. - This results in a
Commandobject (more precisely, an object of one of its subclasses e.g.,DeleteCommand), which is executed by theLogicManager. - The command can communicate with the
Modelwhen it is executed (e.g. to delete a student). - The result of the command execution is encapsulated as a
CommandResultobject, which is returned fromLogic.
Here are the other classes in Logic (omitted from the class diagram above) that are used for parsing a user command:

How the parsing works:
- When called upon to parse a user command, the
ClassManagerParserclass creates anXYZCommandParser(XYZis a placeholder for the specific command name, e.g.AddCommandParser), which uses the other classes shown above to parse the user command and creates anXYZCommandobject (e.g.,AddCommand) which theClassManagerParserreturns as aCommandobject. - All
XYZCommandParserclasses (e.g.,AddCommandParser,DeleteCommandParser, etc.) inherit from theParserinterface so that they can be treated similarly where possible, e.g during testing.
Model component
API : Model.java

The Model component,
- stores Class Manager data, i.e. all
Studentobjects (which are contained in aUniqueStudentListobject). - stores the currently 'selected'
Studentobjects (e.g., results of a search query) as a separate filtered list which is exposed to outsiders as an unmodifiableObservableList<Student>that can be 'observed' e.g. the UI can be bound to this list so that the UI automatically updates when the data in the list change. - stores a
UserPrefobject that represents the user’s preferences. This is exposed to the outside as aReadOnlyUserPrefobject. - does not depend on any of the other three components (as the
Modelrepresents data entities of the domain, they should make sense on their own without depending on other components)
Storage component
API : Storage.java

The Storage component,
- can save both Class Manager data and user preference data in JSON format and read them back into corresponding objects.
- inherits from both
ClassManagerStorageandUserPrefStorage, which means it can be treated as either one (if only the functionality of only one is needed). - depends on some classes in the
Modelcomponent (because theStoragecomponent's job is to save/retrieve objects that belong to theModel)
Common classes
Classes used by multiple components are in the seedu.classmanager.commons package.
Implementation
This section describes some noteworthy details on how certain features are implemented.
Tag feature
About this feature
This feature allows users to tag their student with labels to allow easier recognition of their students by their traits.
Implementation
Tagging a student with Tag is facilitated by TagCommand, AddTagCommand, DeleteTagCommand and TagCommandParser.
TagCommandwill replace all existing tags of a student with input tags.AddTagCommandwill add input tags to the existing tags of the student.DeleteTagCommandwill delete input tags from the existing tags of the student.TagCommandParserwill parse the user input and create the correct command object to execute.
Note: Only 1 of the 3 commands will be executed per user input.
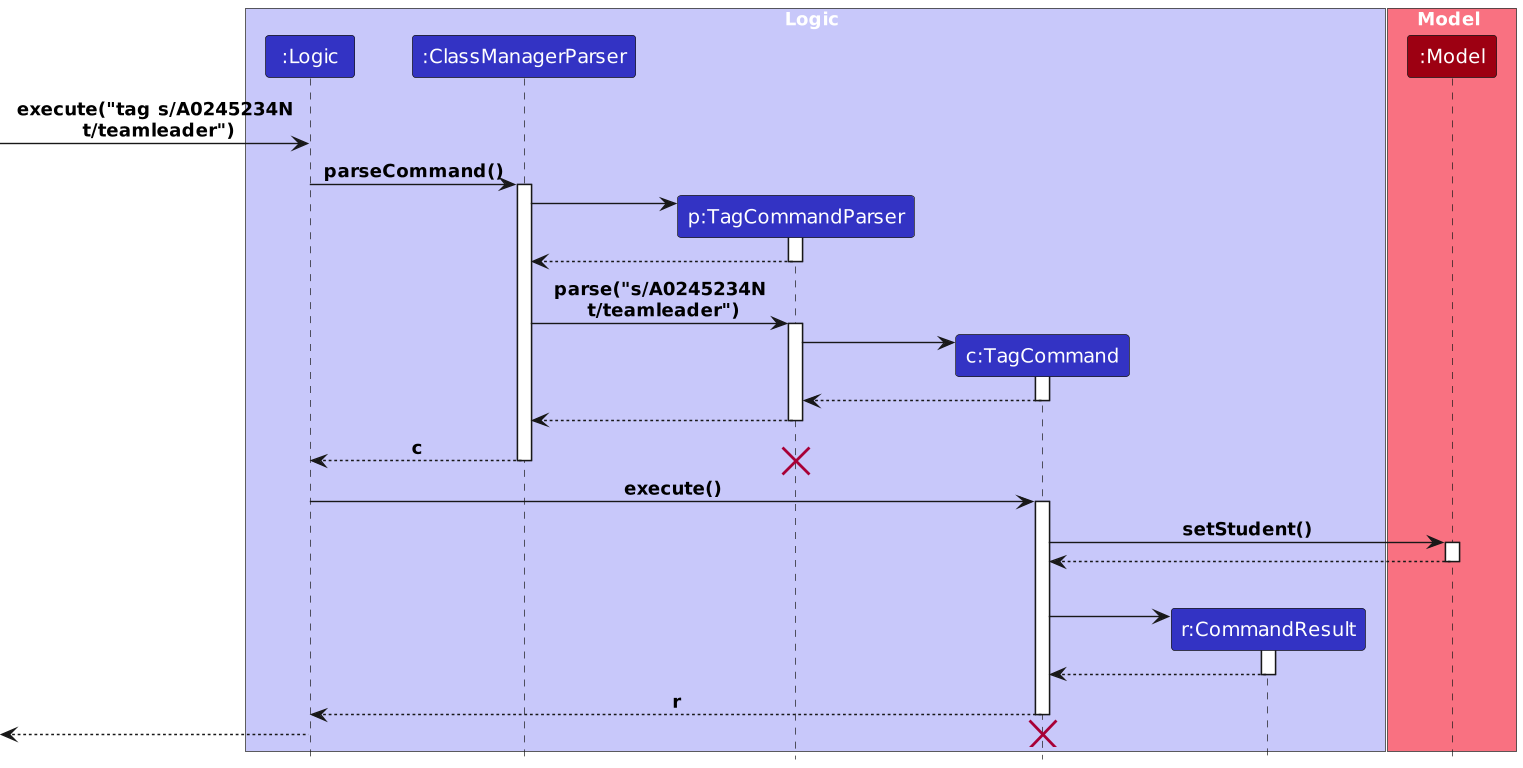
Here is a step-by-step example of how the tag command might be executed.
Step 1. User inputs the tag command.
Step 2. Logic will receive the input and pass it to a ClassManagerParser object, which in turn creates a TagCommandParser object to parse the command.
Step 3. Next TagCommandParser will check for any action identifiers,
/add or /delete, which will create a AddTagCommand object or DeleteTagCommand object respectively,
else a TagCommand object. ParseException will be thrown for any invalid inputs.
Step 4a. AddTagCommand will union the HashSet<Tag> with the student's existing Tag.
Step 4b. DeleteTagCommand will remove all Tag that are in the intersection of the student's existing Tag and HashSet<Tag>.
Step 4c. TagCommand will replace all existing Tag of the student with HashSet<Tag>.
Step 5. TagCommand updates the Student with the new Tag.
Step 6. TagCommand updates the Model with the updated Student by calling Model#setStudent().
Step 7. Finally, the TagCommand creates a CommandResult with a success message and returns it to the LogicManager to complete the command execution. The GUI would also be updated with the change of status.
Note: For Step 5, 6 and 7, AddTagCommand and DeleteTagCommand behaves the same way as TagCommand.
The following sequence diagram summarizes what happens when a user executes a tag command:
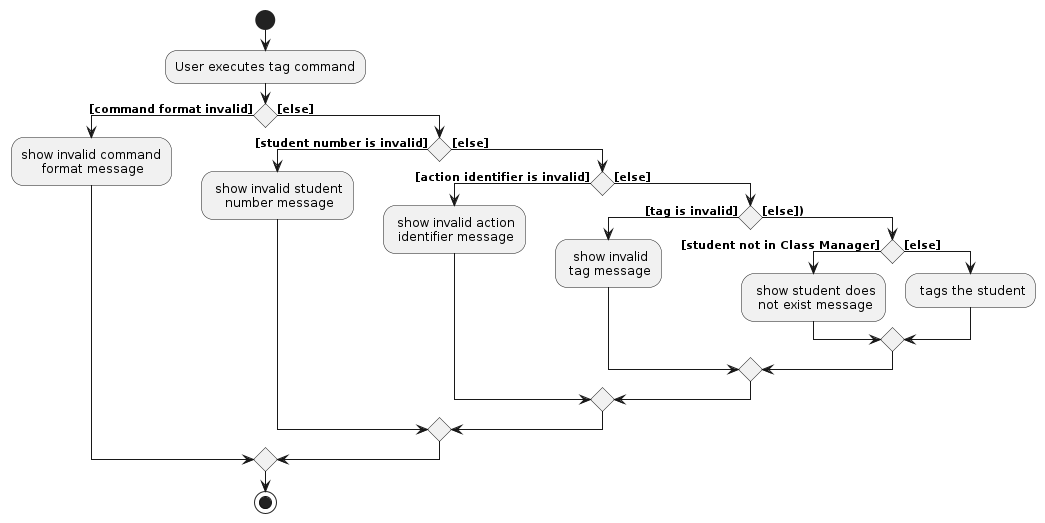
The following activity diagram summarises what happens when a user executes a tag command:
Design considerations:
Aspect: TagCommand
Alternative 1 (current choice): Use different types of TagCommand to handle adding and deletion of tags.
- Pros: Able to handle adding and deletion of tags. Users do not have to retype tags that they want to keep.
- Cons: Users have to input more details.
Alternative 2: Replace all existing tags with input tags.
- Pros: Easy to implement.
- Cons: Users must replace tags that they want to keep.
Undo/redo feature
Implementation
The undo/redo feature works similarly to the one implemented in AddressBook-Level 4, but with support for more commands and a limit to the number of Class Manager states stored. The undo/redo mechanism is facilitated by VersionedClassManager. It extends ClassManager with an undo/redo history, stored internally as a classManagerStateList and currentStatePointer. classManagerStateList only stores up to 10 most recent states of Class Manager to avoid performance issues when a large number of commands are executed. Additionally, it implements the following operations:
VersionedClassManager#commit()— Saves the current Class Manager state in its history.VersionedClassManager#undo()— Restores the previous Class Manager state from its history.VersionedClassManager#redo()— Restores a previously undone Class Manager state from its history.
These operations are exposed in the Model interface as Model#commitClassManager(), Model#undoClassManager() and Model#redoClassManager() respectively.
Given below is an example usage scenario and how the undo/redo mechanism behaves at each step.
Step 1. The user launches the application for the first time. The VersionedClassManager will be initialized with the initial Class Manager state and the currentStatePointer pointing to that single Class Manager state.

Step 2. The user executes delete s/A0123456L command to delete the student with the Student Number A0123456L in Class Manager. The delete command calls Model#commitClassManager(), causing the modified state of Class Manager after the delete s/A0123456L command executes to be saved in the classManagerStateList, and the currentStatePointer is shifted to the newly inserted Class Manager state.

Step 3. The user executes add n/David … to add a new student. The add command also calls Model#commitClassManager(), causing another modified Class Manager state to be saved into the classManagerStateList.

Note: If a command fails its execution, it will not call Model#commitClassManager(), so the Class Manager state will not be saved into the classManagerStateList.
Step 4. The user now decides that adding the student was a mistake and decides to undo that action by executing the undo command. The undo command will call Model#undoClassManager(), which will shift the currentStatePointer once to the left, pointing it to the previous Class Manager state and restores Class Manager to that state.

Note: If the currentStatePointer is at index 0, pointing to the initial ClassManager state, then there are no previous ClassManager states to restore. The undo command uses Model#canundoClassManager() to check if this is the case. If so, it will return an error to the user rather
than attempting to perform the undo.
The following sequence diagram shows how the undo operation works:

Note: The lifeline for UndoCommand should end at the destroy marker (X), but due to a limitation of PlantUML, the lifeline reaches the end of the diagram.
The redo command does the opposite — it calls Model#redoClassManager(), which shifts the currentStatePointer once to the right, pointing to the previously undone state, and restores Class Manager to that state.
Note: If the currentStatePointer is at index classManagerStateList.size() - 1, pointing to the latest Class Manager state, then there are no undone Class Manager states to restore. The redo command uses Model#canRedoClassManager() to check if this is the case. If so, it will return an error to the user rather than attempting to perform the redo.
Step 5. The user then decides to execute the command list. Commands that do not modify Class Manager, such as list, will usually not call Model#commitClassManager(), Model#undoClassManager() or Model#redoClassManager(). Thus, the classManagerStateList remains unchanged.

Step 6. The user executes clear, which calls Model#commitClassManager(). Since the currentStatePointer is not pointing at the end of the classManagerStateList, all Class Manager states after the currentStatePointer will be purged. Reason: It no longer makes sense to redo the add n/David … command. This is the behaviour that most modern desktop applications follow.

In order to implement undo and redo in Class Manager, load and config commands are not supported by undo and redo. This is because undoing load and config can cause Class Manager to be in an inconsistent state. To prevent this, load and config commands call Model#loadReset() and Model#configReset(), respectively. These methods essentially clear classManagerStateList and reset the currentStatePointer to the current Class Manager state, allowing 9 more states of Class Manager to be stored after load and config commands.
The following activity diagram summarizes what happens when a user executes a new command:

Design considerations:
Aspect: How undo & redo executes:
Alternative 1 (current choice): Saves the entire Class Manager.
- Pros: Easy to implement.
- Cons: May have performance issues in terms of memory usage.
Alternative 2: Individual command knows how to undo/redo by itself.
- Pros: Will use less memory (e.g. for
delete, just save the student being deleted). - Cons: We must ensure that the implementation of each command is correct.
- Pros: Will use less memory (e.g. for
Aspect: Data structure to support the undo/redo commands
Alternative 1 (current choice): Use a list to store the history of Class Manager states.
- Pros: Easy to understand.
- Cons: Logic is duplicated twice. For example, when a new command is executed, we must remember to update both
HistoryManagerandVersionedClassManager.
Alternative 2: Use
HistoryManagerfor undo/redo.- Pros: We do not need to maintain a separate list and can just reuse what is already in the codebase.
- Cons: Requires dealing with commands that have already been undone: We must remember to skip these commands. Violates Single Responsibility Principle and Separation of Concerns as
HistoryManagernow needs to do two different things.
Aspect: Commands that support undo & redo
- Alternative 1 (current choice): Not supporting undo/redo for
loadandconfig- Pros: Ensures that Class Manager will not run into issues such as inconsistent states when undoing
loadfor missing saved files. - Cons: Unable to restore student's Class Information after
configcommand resets student Class Information.
- Pros: Ensures that Class Manager will not run into issues such as inconsistent states when undoing
- Alternative 2: Supporting undo/redo for all commands.
- Pros: Ensures that app is consistent with undo/redo, and users will not be unsure if a certain command can be undone.
- Cons: Can be confusing for the user to use undo/redo with
loadandconfig.
Aspect: Number of Class Manager states to store
- Alternative 1 (current choice): Store up to 10 Class Manager states.
- Pros: Ensures that Class Manager will not run into performance issues when a large number of commands are executed.
- Cons: Unable to undo/redo more than 10 commands.
- Alternative 2: Store all Class Manager states.
- Pros: Able to undo/redo more than 10 commands and restore any state of Class Manager in the current session.
- Cons: Will have performance issues when a large number of commands are executed.
Load feature
About this feature
The load feature allows users to load a saved JSON file into the app. Load allows data from the new JSON file to be displayed in Class Manager while setting the new default save file to be the new JSON file. The status bar footer also updates to show the current file path.
This feature is an improvement to the previous method of directly editing the classmanager.json file located in [JAR file location]/data. Users are now able to have multiple JSON files in [JAR file location]/data and choose which file is to be loaded into Class Manager. This allows TAs with multiple courses to have a JSON file for each course and load the JSON file for the course they are currently teaching.
How it is implemented
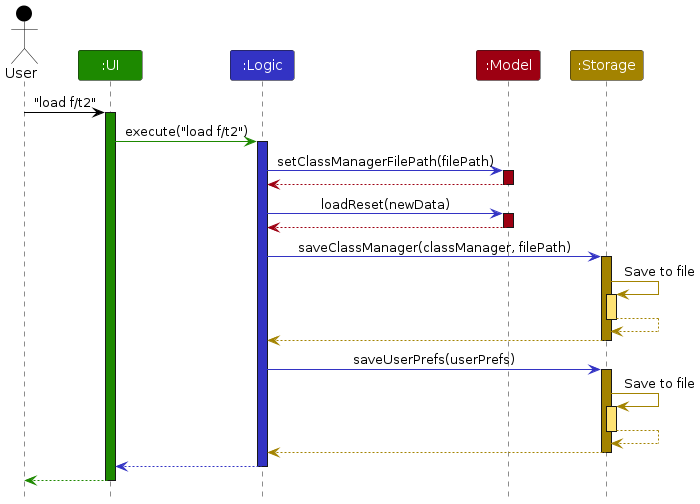
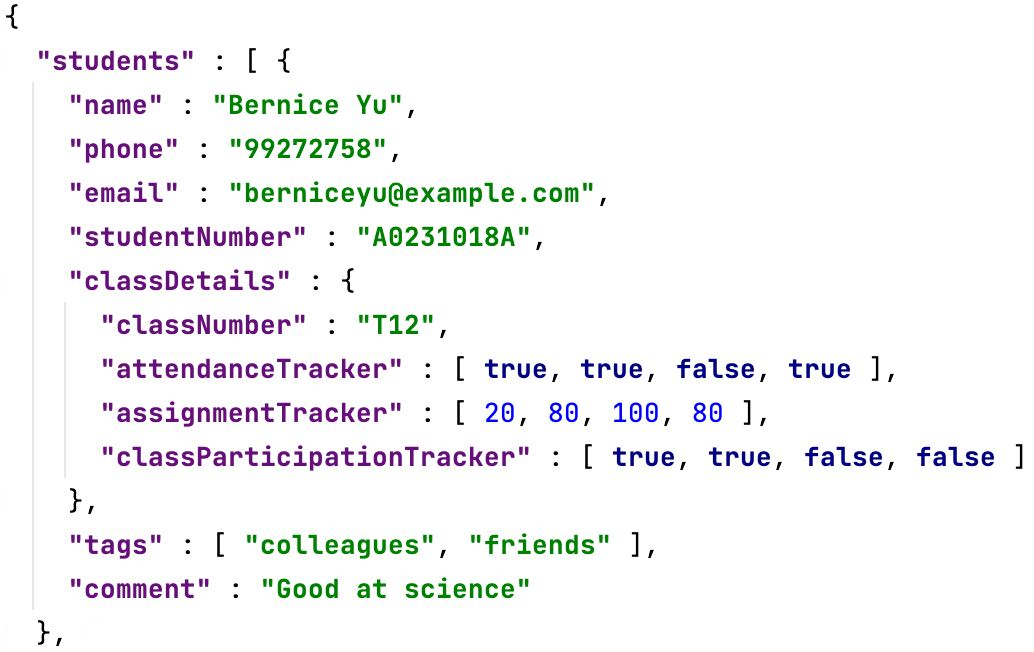
The load command is facilitated by LoadCommand and LoadCommandParser. LoadCommand attempts to read the JSON file and checks if the tutorial and assignment count for each student matches the current configuration of Class Manager. If the file is valid (each Student's information follows the format in the image below), it then calls setClassManager and setClassManagerFilePath of Model to update the new save file path and Class Manager data to be displayed. LoadCommand then resets VersionedClassManager to clear the undo/redo history of Class Manager.
Valid JSON format
Parsing user input
- The user inputs the
loadcommand. - The
ClassManagerParserprocesses the input and creates a newLoadCommandParser. - The
LoadCommandParserthen calls ArgumentTokenizer#tokenize(String argString, Prefix... prefixes) to extract the file name. If there are duplicate prefixes, a ParseException would be thrown. - The file name is then checked to ensure that it is valid. If the file name is missing, null or contains a forward slash, a ParseException would be thrown.
- The
LoadCommandParserthen creates theLoadCommandbased on the processed input.
Design considerations:
Aspect: Files that can be loaded:
- Alternative 1 (current choice): Only JSON files can be loaded.
- Pros: Easy to implement.
- Cons: Users may want to load other types of files.
- Alternative 2: Allow users to load any type of file.
- Pros: Users can use files of other formats that may be generated from other applications.
- Cons: A lot of effort is needed to ensure that the data of each file type is valid.
Config feature
The config command allows TAs to set the number of tutorials and the number of assignments in a module. This allows the Class Manager to be able to display the correct number of tutorials and assignments for the TA to enter the grades for each student. This also provides more flexibility to TAs as their class may differ from the default configuration of 13 tutorials and 6 assignments.
How it is implemented
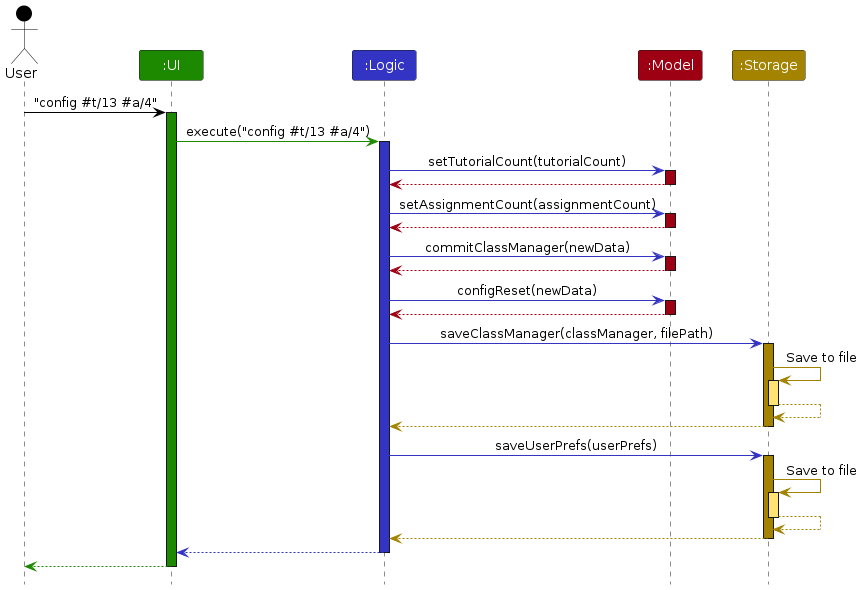
The config command is facilitated by ConfigCommand and ConfigCommandParser. ConfigCommand updates the tutorial and assignment count of Class Manager by calling setTutorialCount and setAssignmentCount of Model to update the preferences.json file. Simultaneously, it updates the static tutorial and assignment count of ClassDetails to recreate the ClassDetails objects for students accurately. All students in the current file will have their Class Information updated to reflect the new configuration. ConfigCommand then resets the student shown in the view panel, as well as VersionedClassManager, to clear the undo/redo history of Class Manager.
Parsing user input
- The user inputs the
configcommand. - The
ClassManagerParserprocesses the input and creates a newConfigCommandParser. - The
ConfigCommandParserthen calls ArgumentTokenizer#tokenize(String argString, Prefix... prefixes) to extract the tutorial count and assignment count. If there are duplicate prefixes, a ParseException would be thrown. - The tutorial and assignment counts are then checked to ensure that they are integers between 1 and 40 inclusive. If any of the counts are not valid, a ParseException would be thrown.
- The
ConfigCommandParserthen creates theConfigCommandbased on the processed input.
Design considerations:
In v1.2, config was initially implemented as a command that users could only execute once before they started using Class Manager. This allows ClassDetails to create fixed-length arrays for AssignmentTracker, AttendanceTracker and ClassParticipationTracker.
However, this implementation was changed in v1.3 to allow users to execute config multiple times. This allows users to reconfigure Class Manager if they have entered the wrong information previously. We decided to reset the Class Information of a student back to the default values of 0 for attendance, class participation and assignment grades, as it ensures a consistent implementation of config regardless of whether the new tutorial count and assignment count were smaller or larger than the previous configuration.
In addition, the tutorial and assignment count was limited to an integer between 1 and 40 inclusive in v1.4. This prevents division by zero bugs encountered in data visualisation, as well as Class Manager being unresponsive when the user enters a large number of tutorials and assignments.
Aspect: Number of times Class Manager can be configured
- Alternative 1 (current choice): Class Manager can be configured multiple times.
- Pros: Provides more flexibility to TAs as they may enter the wrong information when configuring.
- Cons: Student Class Information is completely reset upon configuration, which may be an issue for the user.
- Alternative 2: Class Manager can only be configured once.
- Pros: Ensures that Class Manager will not run into issues with data visualisation.
- Cons: Unable to change the tutorial and assignment count of Class Manager after it has been configured.
Lookup feature
The lookup command allows TAs to search and filter for students in the Class Manager. This allows TAs to find the student they are looking for quickly, and perform subsequent operations such as editing Class Information for student(s). This also provides more flexibility to TAs as they may want to search for students based on different criteria.
How it is implemented
Note: To shorten the sequence diagram, we use SCKP as an abbreviation for StudentContainsKeywordsPredicate.
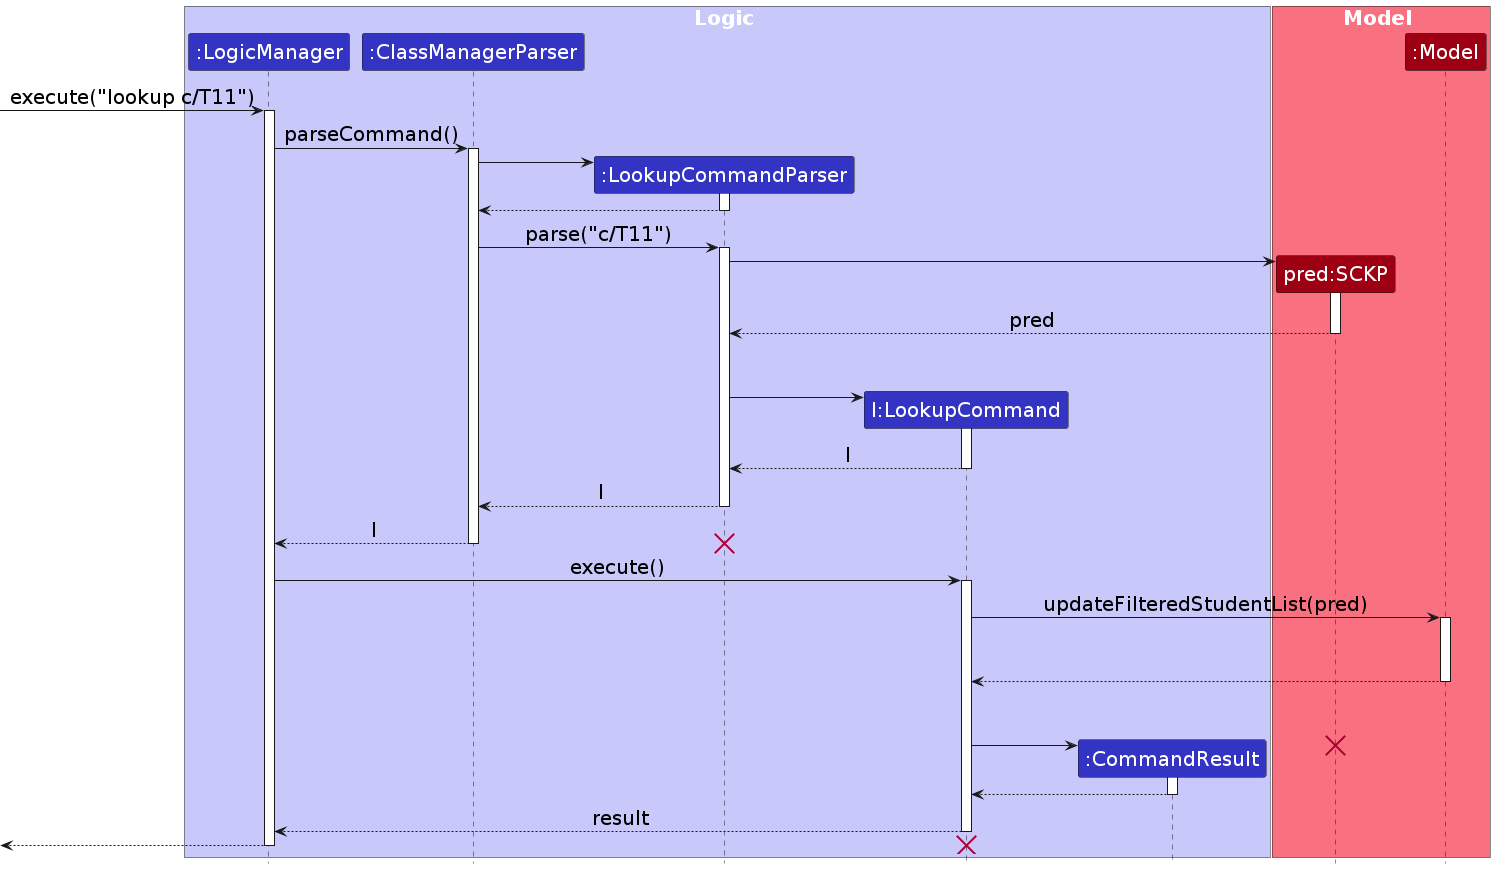
The lookup command is facilitated by LookupCommand and LookupCommandParser.
LookupCommandParser will parse the user input and create a corresponding StudentContainsKeywordsPredicate, which implements the Predicate<Student> interface.
LookupCommand will then call Model#updateFilteredStudentList() to update the student list by utilizing the StudentContainsKeywordsPredicate to test whether a student satisfies the given criteria or not. The filtered list will then be displayed in the UI.
Parsing user input
- The user inputs the
lookupcommand. - The
ClassManagerParserprocesses the input and creates a newLookupCommandParser. - The
LookupCommandParserthen callsArgumentTokenizer#tokenize(String argString, Prefix... prefixes)to extract the criteria provided by the user. If there are duplicate prefixes, a ParseException would be thrown. - A
StudentContainsKeywordsPredicateis then created based on the processed input. - The
LookupCommandParserthen creates theLookupCommandbased on the processed input.
Design considerations:
Aspect: Criteria for lookup
- Alternative 1 (current choice): Only basic student information can be used as criteria for lookup.
- Pros: Easy to implement.
- Cons: Users may want to use other types of student information as criteria for lookup.
- Alternative 2: Allows users to use any type of student information (Including Class Information) as criteria for lookup.
- Pros: Users have more flexibility when searching for students.
- Cons: There will be more coupling between classes.
Aspect: Criteria Validation
Alternative 1 (current choice): The
LookupCommandParserdoes not apply any validation to the user input.- Pros: Easy to implement.
- Cons: Users may enter invalid criteria for lookup, and the
LookupCommandwill still be executed. This can cause some confusion for the user.
Alternative 2: The
LookupCommandParserwill apply validation to the user input.- Pros: Less confusion for the user, and behaviour is consistent with other commands.
- Cons: The implementation will be more complex.
Aspect: Criteria Combination for complex lookup
Alternative 1 (current choice): Within a field, the operation is OR, and between fields the operation, is AND.
For example,
lookup n/alex david c/T11 T12will have the criteria:(name contains alex OR david) AND (class number is T11 OR T12)- Pros: The behaviour is consistent with other commands.
- Cons: This combination may not be intuitive for the user.
Alternative 2: The combination can be specified by the user.
For example,
lookup n/alex \AND david \OR c/T11 \OR T12will have the criteria:(name contains alex AND david) OR (class number is T11 OR T12)- Pros: The user can specify any combination of criteria.
- Cons: The command will be more complicated to implement, as the order of the keywords and the logic operators will be used to determine the
StudentContainsKeywordsPredicate. In addition, the syntax can be confusing for the user.
One such example is the commandlookup n/alex \AND david \OR liwhich can have two different interpretations:(name contains alex AND david) OR (name contains li)(name contains alex) AND (name contains david OR li)
Theme feature
The theme command allows TAs to toggle/switch between light and dark themes.
Implementation
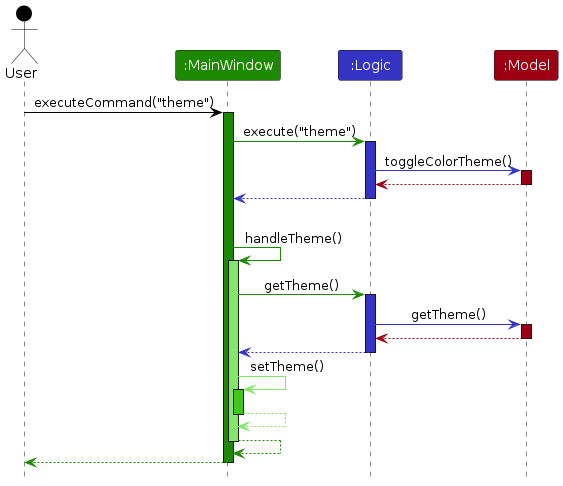
The theme feature is facilitated by the ThemeCommand, and inside the Model component, the UserPrefs class stores the current colour theme settings.
Here is a step-by-step example of how the theme command might be executed.
- The user inputs the
themecommand. - The
Logiccomponent will receive the input and create a newThemeCommandobject. - When
ThemeCommandis executed, it will callModel#toggleTheme()to update the colour theme settings in theUserPrefsclass. - The
MainWindowclass in theUIcomponent will then fetch the new colour theme settings from theUserPrefsclass. - The
MainWindowclass will then update the GUI colour theme accordingly.
Below is a sequence diagram that shows how the theme command is executed.
Design considerations:
Aspect: Fetching the new colour theme setting
Alternative 1 (current choice): The
MainWindowclass fetches the new colour theme through theLogiccomponent.- Pros: Easy to implement.
- Cons: Additional operations are required to fetch the new setting from the
UserPrefsclass.
Alternative 2: The new setting is contained in the
CommandResultobject.- Pros: The
MainWindowclass can use the new setting directly from theCommandResultobject. - Cons: The
CommandResultclass will be modified to contain the new setting.
- Pros: The
Class Details feature
Implementation
The proposed class details mechanism for each student will be facilitated by ClassDetails. It allows for the tracking
of a Student's class details, such as their tutorial group, tutorial attendance, class participation, and assignment
grades. It will be stored as 3 separate classes to model each of the 3 different types of class details (We will
call them "Class Information"), and a tracker
class to act as the manager for each of the Class Information, with the trackers composing the ClassDetails class.
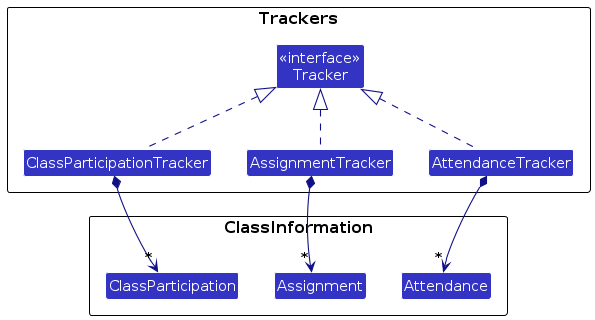
The 3 different types of Class Information are:
Attendance- Stores the details of a student's attendance in a specific tutorial. Attendance will be stored as a boolean value.ClassParticipation- Stores the details of a student's participation in a specific tutorial. Class participation will be stored as a boolean value.Assignment- Stores the details of a student's assignment grades for a specific tutorial. Assignment grades will be stored as an integer value, with the total marks standardized to 100 marks.
These components will be stored in their respective tracker classes, using Java Arrays to store the objects. The position of the classes in the array will correspond to the index of the tutorial or assignment. For example, the first index of the array will correspond to either the first tutorial or assignment, depending on the tracker class.
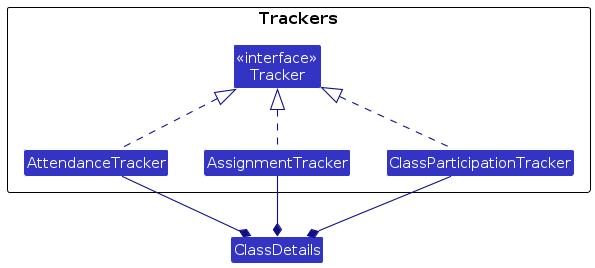
The tracker classes will be stored in the ClassDetails class, which will be composed of the following classes:
AttendanceTracker- Stores theAttendanceobjects for a specific student.ClassParticipationTracker- Stores theClassParticipationobjects for a specific student.AssignmentTracker- Stores theAssignmentobjects for a specific student.
These tracker classes will inherit from a tracker interface. They will also support the following operations:
getPercentage()- Returns the average grade of the student for the specific tracker class. For example, the average tutorial attendance percentage or the average assignment score.getJson()- Returns a Json Friendly representation of the tracker.
Each of these tracker classes will be initialized with a specific size, which will be the number of tutorials or assignments.
Design considerations:
Aspect: Class Information classes
Alternative 1 (current choice): Use a class for each type of Class Information.
- Pros: Easy to implement, follows OOP principle. If we want to edit the implementation of each of the classes or change the data structure/details of each instance, it can be done easily.
- Cons: May have performance issues in terms of memory usage.
Alternative 2: Store class values as a primitive type (String or Integer).
- Pros: Will use less memory.
- Cons: We must ensure that the implementation of each class is correct. Implementation will be more complex as different class detail types will require different implementations for the same operation.
Aspect: Tracker classes
Alternative 1 (current choice): Use a tracker class for each type of Class Information.
- Pros: Easy to implement. Shared functions can be abstracted out, and polymorphism can be applied.
- Cons: May have performance issues in terms of memory usage.
Alternative 2: Store class values as an Object Array.
- Pros: Will use less memory.
- Cons: Will need to implement different functions for each type of class details. Implementation will be more complex. SLAP principle might not be able to be adhered to.
Data visualisation feature
About this feature
The data visualisation feature allows users to visualize the Class Information fields of each student. The display will be located inside the student list card, next to the other details of the students.
There will be 3 bar graphs associated with each student, one for each of the Class Information fields, representing the overall percentage of each field across a semester.
How it is implemented
The data visualisation feature is facilitated by each Class Information Tracker. Each tracker will have a method that will calculate the average percentage of the field.
These methods are called by the StudentCard class in the UI package within a method used to initialize the FXML bar chart.
Present feature
About this feature
The present feature allows users to mark a specific student to be present in a specific tutorial in the app.
This feature builds upon the current design of Student and ClassDetails.
How it is implemented
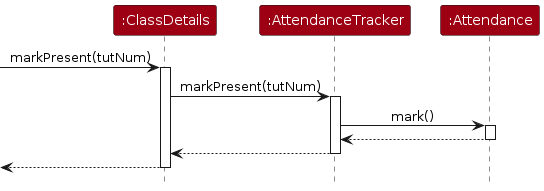
Note: The diagram above only shows part of the interactions within the model component. The interactions within the logic component are similar to other commands.
Design considerations:
The feature should be implemented based on the current design of Student and ClassDetails. Alternative designs may exist, such as treating the attendance and participation as association classes.
Note: Other similar features, such as absent, class-part, and grade, are implemented similarly.
View feature
About this feature
The view feature allows users to view the Class Information of their students.
Note: The view command is the only way to change the student being viewed in the GUI.
Implementation
The view command is facilitated by the ViewCommandParser and the ViewCommand. It uses Model#setSelectedStudent() to select the student that is to be viewed in the GUI.
Here is a step-by-step example of how a view command is executed:
Step 1. User inputs a view command.
Step 2. Logic will receive the input and pass it to a ClassManagerParser object, which in turn creates a ViewCommandParser object to parse the command.
Step 3. ViewCommandParser will check if the input is valid. If the input is valid, it will create a ViewCommand object to execute the command. Else ParseException is thrown.
Step 4. ViewCommand will use Model#setSelectedStudent() to set the requested student to be viewed in the GUI.
The following sequence diagram will show what happens when a user executes a view command:
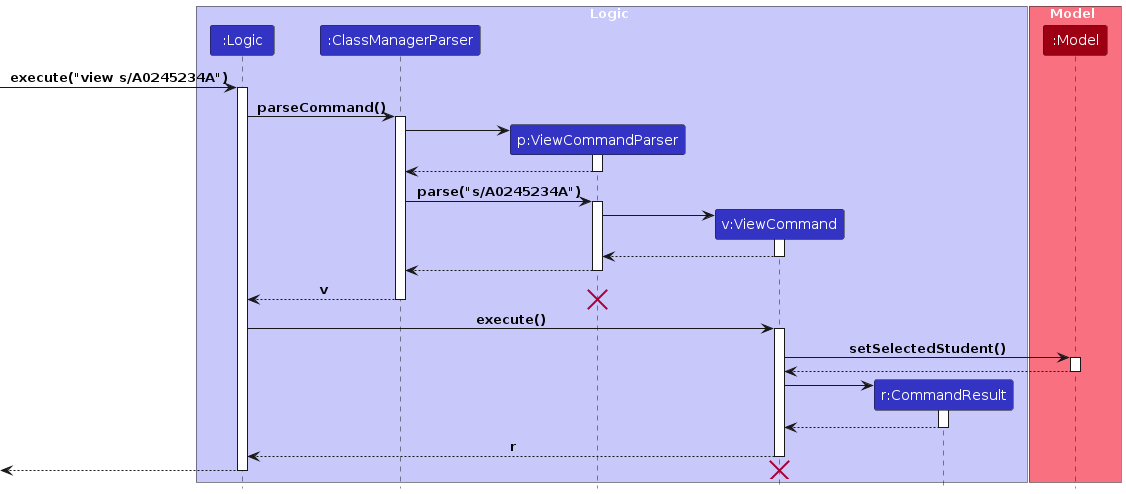
The following activity diagram will show what happens when a user executes a view command:
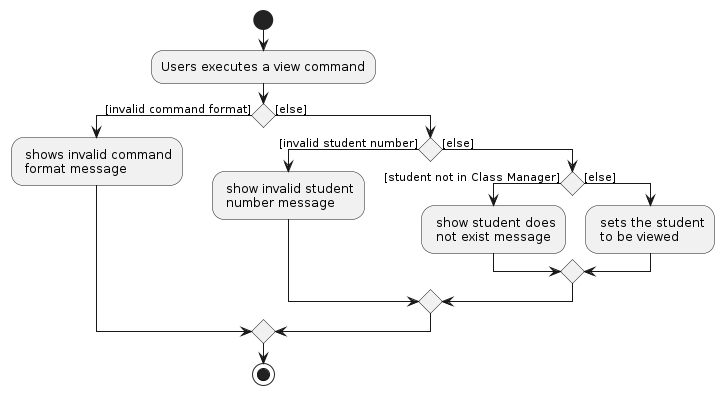
Design Considerations
Aspect: ViewCommand
Alternative 1 (current choice): Using a command to view the Class Information of a student.
- Pros: Reduces clutter in the
GUI. - Cons: User has to enter a command whenever they want to view the Class Information of a different student.
- Pros: Reduces clutter in the
Alternative 2: Listing all the Class Information of every student.
- Pros: Easy to implement.
- Cons: Very messy and clutters the
GUI.
Documentation, logging, testing, configuration, dev-ops
Appendix: Requirements
Product scope
Target user profile:
- NUS CS2103/T Teaching Assistants
- needs to manage student information across different classes
- prefer desktop apps over other types
- can type fast
- prefers typing to mouse interactions
- is reasonably comfortable using CLI apps
Value proposition:
- provide fast access to student’s contact information
- provide easy ways to compare and visualise student's grades across classes
- optimised for users who prefer CLI
User stories
Priorities: High (must have) - * * *, Medium (nice to have) - * *, Low (unlikely to have) - *
| Priority | As a … | I want to … | So that I can… |
|---|---|---|---|
* * * | TA | manually enter the details of students into my Class Manager | track the information |
* * * | TA | be able to delete students from the class | manage students who drop out |
* * * | TA | edit the contact information of students | maintain the correct information if it changes |
* * | TA | keep track of the attendance percentage of each student | use it for their participation grade |
* * | TA | be able to add the grades of each student in each tutorial | use it to view students that need help |
* | TA | be able to keep records of my students in past semesters | refer to the history of student performance |
* | TA | add comments to specific students | attach additional information to them |
* * * | TA | tag students with certain labels | filter and search more conveniently |
* * * | TA | lookup all students in a particular tutorial group | obtain their contact information |
* * | TA | search particular students across different tutorial groups | contact them easily |
* | TA | know the students I searched recently | minimize repeated searches |
* * | TA | filter students by tags/labels | categorise and organise students |
* * | TA | filter students by their year of study | gain a better understanding of the whole tutorial |
* | TA | have a composite filter for tutorial group attendance | look up the attendance of a particular tutorial group on a certain week |
* | TA | randomly select a specific number of students | use as a feature during teaching |
* * | TA | sort students by coding experience | group students with similar experience levels |
* * | TA | sort students based on their score marks | understand the performance of the whole class |
* * | TA | sort students by alphabetical order | compare to the attendance sheet |
* * | TA | sort students by their overall grades | identify students falling behind in my class |
* | TA | customise my GUI | use a theme that suits my desktop theme |
* | TA | enable dark mode for my device | use it at night |
* | TA | choose different layouts | select a comfortable layout |
* * | TA | have keyboard shortcuts for commonly used features | save time and fit my habit |
* * | TA | customise commands | save time and fit my habit |
* * * | TA | export and import app’s data | work on different devices |
* * * | TA | save queries and searches to the application | not lose progress |
* * * | new user | see usage instructions | refer to instructions when I forget how to use the app |
Use cases
(For all use cases below, the System is Class Manager, and the Actor is the user, unless specified otherwise)
Use case: UC01 - Delete a student
MSS
User requests to delete a specific student with the student's student number
Class Manager deletes the student
Use case ends.
Extensions
1a. The given student number is invalid.
1a1. Class Manager shows an error message.
Use case resumes at step 1.
1b. The given student number does not exist in Class Manager.
1b1. Class Manager shows an error message.
Use case resumes at step 1.
Use case: UC02 - Tag a student with a label
MSS
User requests to list students
Class Manager shows a list of students
User requests to tag a specific student in the list
Class Manager tags the student
Use case ends.
Extensions
2a. The list is empty.
Use case resumes at step 1.
3a. The given student number is invalid.
3a1. Class Manager shows an error message.
Use case resumes at step 3.
3b. The given tag is invalid.
3b1. Class Manager shows an error message.
Use case resumes at step 3.
3c. The given student number does not belong to any student in the list.
3c1. Class Manager shows an error message.
Use case resumes at step 3.
Use case: UC03 - Loading a saved file
MSS
User copies saved JSON file to data folder
User requests to load JSON file
Class Manager reads and loads the JSON file
Class Manager updates the app to show the new data
Use case ends.
Extensions
3a. The JSON file cannot be found.
3a1. Class Manager shows an error message.
Use case resumes at step 2.
4a. The JSON file data is invalid.
4a1. Class Manager shows an error message.
Use case resumes at step 3.
Use case: UC04 - Look up a list of students
MSS
User requests to look up students with a given criteria.
Class Manager checks each student in the list with the given criteria.
Class Manager shows a list of students that match the criteria.
Use case ends.
Extensions
1a. There are no criteria given.
1a1. Class Manager shows an error message.
Use case ends.
2a. There are no students in the list that match the criteria.
2a1. Class Manager shows an error message.
Use case ends.
Use case: UC05 - Randomly select a specific number of students
MSS
User requests to randomly select a specific number of students.
Class Manager randomly selects the students from all students displayed.
Class Manager shows a list of students that are randomly selected.
Use case ends.
Extensions
1a. The number of students to be selected is more than the number of students in the list.
1a1. Class Manager shows an error message.
Use case resumes at step 1.
1b. The number of students to be selected is less than 1.
1b1. Class Manager shows an error message.
Use case resumes at step 1.
Use case: UC06 - Modifying a student's Class Information
MSS
User requests to modify a student's Class Information.
Class Manager modifies the student's Class Information.
Class Manager shows the student's updated Class Information.
Use case ends.
Extensions
1a. The student does not exist in Class Manager.
1a1. Class Manager shows an error message.
Use case resumes at step 1.
1b. The modifying request is invalid.
1b1. Class Manager shows an error message.
Use case resumes at step 1.
Use case: UC07 - Configuring module information
MSS
User requests to configure Class Manager.
Class Manager modifies the tutorial and assignment count.
Class Manager updates the app to show the new Class Information.
Use case ends.
Extensions
2a. The tutorial or assignment count is invalid.
2a1. Class Manager shows an error message.
Use case resumes at step 1.
Use case: UC08 - Undoing a command
MSS
User deletes a specified student (UC01).
User requests to undo the deletion.
Class Manager restores the deleted student.
Use case ends.
Use case: UC09 - Redoing a command
MSS
User undoes the deletion of a specified student (UC08).
User requests to redo the undone command.
Class Manager deletes the student.
Use case ends.
Use case: UC10 - Viewing command history
MSS
User requests to view command history.
Class Manager displays the command history of the current session.
Use case ends.
Use case: UC11 - Viewing a student's Class Information
MSS
- User request to view a student's Class Information.
- Class manager displays the student's Class Information.
Extensions
1a. The requested student does not exist in the Class Manager.
1a1. Class Manager displays an error message.
Use case resumes at step 1.
{More to be added}
Non-Functional Requirements
- Should work on any mainstream OS as long as it has Java
11or above installed. - Should be able to hold up to 1000 students without a noticeable sluggishness in performance for typical usage.
- A user with above average typing speed for regular English text (i.e. not code, not system admin commands) should be able to accomplish most of the tasks faster using commands than using the mouse.
- The Application needs to have proper documentation and user guide so that users can understand how to use the application.
- The Application should allow users to customize the color scheme to enhance the user experience.
Glossary
- CLI: Command Line Interface.
- Class Information: The grades, attendance and class participation details of a student in Class Manager.
- Email: An electronic mail address, such as NUS email addresses (eXXXXXXX@u.nus.edu).
- GUI: Graphical User Interface.
- JAR: Java Archive, a package file format typically used to aggregate many Java class files and associated metadata and resources (text, images, etc.) into one file to distribute application software or libraries on the Java platform.
- JSON: JavaScript Object Notation, a lightweight data-interchange format.
- Mainstream OS: Windows, Linux, Unix, OS-X
- Student Number: Unique matriculation number of a NUS student. In Class Manager, it must begin with the capital letter 'A', followed by 1 or more consecutive digits, and end with a single alphabetical character. Student Number must not be blank as well.
Appendix: Instructions for manual testing
Given below are instructions to test the app manually.
Note: These instructions only provide a starting point for testers to work on; Testers are expected to do more exploratory testing.
Launch and shutdown
Initial launch
Download the JAR file and copy it into an empty folder.
Launch the app by double-clicking the JAR file icon in your file explorer or running
java -jar class-manager-2023.jarin command terminal.
Expected: Shows the GUI with a set of sample contacts. The window size may not be optimal.
Save window preferences
Resize the window to an optimal size. Move the window to a different location. Close the window.
Re-launch the app by double-clicking the JAR file icon in your file explorer or running
java -jar class-manager-2023.jarin command terminal.
Expected: The most recent window size and window location are retained.
Configure Class Manager
Setup
- Move the JAR file to a fresh directory.
- Run and close the app before starting this test. (This is to ensure a fresh
classmanager.jsonandpreferences.json)
Test cases
Configure Class Manager with valid tutorial and assignment counts
- Enter:
config #t/3 #a/3
Expected: The list of students shown in the GUI is the same as the one inclassmanager.json. - Enter:
add n/John Doe p/999 e/john@gmail.com s/A0981234X c/T11
Expected: The student John Doe is added to the bottom of the Student List. Details of John Doe are shown in the Result Display Box. - Enter:
view s/A0981234X
Expected: The student John Doe is shown in the view panel. The student's Class Information is shown in the view panel, with the tutorial and assignment count both updated to 3. - Enter:
present-all tut/1
Expected: All the students have their attendance marked for tutorial 1. The bar graph for all student's attendance is updated to show the attendance for tutorial 1. The attendance of John Doe for tutorial 1 is now present in the view panel. - Enter:
config #t/4 #a/4
Expected: The list of students shown in the GUI is the same as the one inclassmanager.json, but their attendance bar graph is reset to 0. - Enter:
view s/A0981234X
Expected: The student John Doe is shown in the view panel. The student's Class Information is shown in the view panel, with the tutorial and assignment count both updated to 4. The student's attendance for tutorial 1 is now absent.
- Enter:
Configure Class Manager with a tutorial count that is less than 1
- Enter:
config #t/0 #a/3
Expected: Error messageInvalid count values! The count value of tutorials cannot be less than 1.
- Enter:
Configure Class Manager with a valid tutorial count but is missing an assignment count
- Enter:
config #t/10
Expected: Error message:Invalid command format! config: Configures Class Manager with the module information. WARNING: Configuring Class Manager resets the grades, attendance and class participation details of all students. This cannot be undone. The default Class Manager is configured with 13 tutorials and 6 assignments. Parameters: #t/TUTORIAL_COUNT #a/ASSIGNMENT_COUNT Example: config #t/10 #a/4
- Enter:
Display help
Display help.
- Test case:
help
Expected: The help window with the full list of commands is shown.
- Test case:
Add a student
Add a new student to Class Manager.
- Test case:
add n/NAME s/STUDENT_NUMBER e/EMAIL
Expected: The student with NAME, STUDENT_NUMBER and EMAIL is added to the list. Details of the added student are shown in the Result Display Box.
- Test case:
Add an already existing student to Class Manager.
- Test case: Student Number that is already present in the list
Expected: No student is added. Error details are shown in the Result Display Box.
- Test case: Student Number that is already present in the list
Add a student without some required fields.
- Test case:
add n/NAME s/STUDENT_NUMBER e/EMAIL,add n/NAME s/PHONE e/EMAIL
Expected: No student is added. Error details are shown in the Result Display Box.
- Test case:
Add a comment to a student
Add a comment to a student in Class Manager.
- Test case:
comment s/STUDENT_NUMBER cm/COMMENT
Expected: The student with STUDENT_NUMBER is edited to have the new COMMENT.
- Test case:
Add a comment to a student where the student is not in Class Manager (Invalid Student Number).
- Test case: Comment command with Student Number that is not present in the list.
Expected: No student is edited. Error details are shown in the Result Display Box.
- Test case: Comment command with Student Number that is not present in the list.
Add a comment to a student where the new comment is empty.
- Test case:
comment s/STUDENT_NUMBER cm/
Expected: Student is edited to have an empty comment.
- Test case:
Delete a student
Delete an existing student from Class Manager.
- Test case:
delete s/STUDENT_NUMBER
Expected: STUDENT_NUMBER is a valid Student Number that exists in the Class Manager. The student with STUDENT_NUMBER is deleted from the Class Manager.
- Test case:
Delete a student with an invalid student number.
- Test case:
delete s/vnqvq1924
Expected: No student is deleted. Student Number error and its details are shown in the Result Display Box.
- Test case:
Edit a student
Edit an existing student's details in Class Manager.
- Test case:
edit STUDENT_NUMBER n/NAME
Expected: STUDENT_NUMBER is a valid Student Number that exists in the Class Manager. The student with STUDENT_NUMBER is edited to have the new NAME. - Test case:
edit STUDENT_NUMBER s/NEW_STUDENT_NUMBER
Expected: The student with STUDENT_NUMBER is edited to have the NEW_STUDENT_NUMBER.
- Test case:
Edit a student's details who do not exist in Class Manager.
- Test case: Edit command with Student number that does not belong to any student in Class Manager.
Expected: No student is edited. Error details shown in the Result Display Box.
- Test case: Edit command with Student number that does not belong to any student in Class Manager.
List students
List all students in Class Manager.
- Test case:
list
Expected: The list of students is shown in the student list.
- Test case:
Lookup students
Lookup students in Class Manager using valid criteria.
- Test case:
lookup n/NAME
Expected: The list of students with NAME will be displayed in the student list. - Test case:
lookup c/CLASS_NUMBER
Expected: The list of students who are in CLASS_NUMBER will be displayed in the student list. - Test case:
lookup t/TAG c/CLASS_NUMBER
Expected: The list of students who have tags that match TAG and are in CLASS_NUMBER will be displayed in the student list.
- Test case:
Lookup students in Class Manager using invalid criteria.
- Test case:
lookup s/x(where x is an invalid student number)
Expected: The display result will showNo match found!. This is because the lookup command does not do field validation. - Test case:
lookup c/class 11 n/john(where "class 11" is an invalid class number)
Expected: The display result will showNo match found!. This is because the lookup command does not do field validation.
- Test case:
Lookup with no criteria given.
- Test case:
lookup
Expected: Error message shown in the display result. - Test case:
lookup c/
Expected: Error message shown in the display result.
- Test case:
Tag a student
Tag an existing student in the Class Manager.
- Test case:
tag s/STUDENT_NUMBER t/TAG
Expected: All tags of student with STUDENT_NUMBER will be replaced with TAG.
- Test case:
Add a tags to student.
- Test case:
tag s/STUDENT_NUMBER /add t/TAG
Expected: The student with STUDENT_NUMBER will have TAG added to existing tags.
Note: Even if the student has TAG tagged, the command ensures that the student will have TAG as one of the tags.
- Test case:
Delete tags from student.
- Test case:
tag s/STUDENT_NUMBER /delete t/TAG
Expected: The student with STUDENT_NUMBER will have theTagTAG removed from existing tags.
Note: Even if the student does not have TAG tagged, the command ensures that the student will not have TAG as one of the tags.
- Test case:
Delete all tags from student.
- Test case:
tag s/STUDENT_NUMBER t/
Expected: The student with STUDENT_NUMBER will have all tags removed.
- Test case:
Attempt to tag a student not in Class Manager.
- Test case:
tagcommand with a student number that is not in the Class Manager.
Expected: Error message is shown in the display result.
- Test case:
Mark a student as present
Note: A similar way can be adopted to test absent.
Mark an existing student as present in Class Manager.
- Test case:
present s/STUDENT_NUMBER tut/1
Expected: STUDENT_NUMBER is a valid Student Number that exists in the Class Manager. The student with STUDENT_NUMBER is marked as present for the first tutorial.
- Test case:
Mark all displayed students as present
Note: A similar way can be adopted to test absent-all.
Mark all displayed students as present in Class Manager.
- Test case:
present-all tut/1
Expected: All displayed students are marked as present for the first tutorial.
- Test case:
Randomly select students
Randomly select a specified number of students from the list of displayed students.
- Test case:
random 2
Expected: Two students from the list of displayed students are randomly selected. Ensure at least two students are displayed.
- Test case:
View a student
View a student who exists in Class Manager.
- Test case:
view s/STUDENT_NUMBER
Expected: The Class Information of the student with STUDENT_NUMBER will be displayed in the Class Information panel on the right.
- Test case:
View a student who does not exist not in Class Manager.
- Test case:
viewcommand with a student number that does not exist in Class Manager
Expected: Error message shown in the display result.
- Test case:
Invalid Student number.
- Test case:
view s/x(where x is an invalid student number)
Expected: Error message shown in the display result.
- Test case:
Load data files
Setup
- Move the JAR file to a fresh directory.
- Run and close the app before starting this test. (This is to ensure a fresh
classmanager.jsonandpreferences.json) - Copy the sample data file
classmanager.json. Paste 2 copies of the file in the same directory asclassmanager.json. Rename the copies tot1.jsonandt2.json. - Please do not delete the data file
classmanager.json, as it will be used as the starting default file.
Test cases
- Load a valid data file.
- Enter:
load f/t1
Expected: The data int1.jsonis loaded into the app. The status bar on the bottom left is updated to show the new file path. The list of students shown in the GUI is the same as the one inclassmanager.json.
- Enter:
- Load a corrupted data file.
- Open and edit
t2.jsonwith a text editor. Add some random text to the file or delete some text from the file. - Enter:
load f/t2
Expected: The data int2.jsonis not loaded into the app. The status bar on the bottom left is unchanged. File error details are shown in the Result Display Box.
- Open and edit
- Load a missing data file.
- Enter:
load f/t3
Expected: The status bar on the bottom left is unchanged. File error details are shown in the Result Display Box.
- Enter:
Undo/redo commands
Test cases
Undo a command
Test case:
clear->undo
Expected: Theclearcommand is undone. The list of students shown in the GUI is the same as the one before theclearcommand.Test case:
add->undo
Expected: Theaddcommand is undone. The newly added student is removed from the list of students.
Redo a command
Test case:
clear->undo->redo
Expected: Theclearcommand is redone. The list of students shown in the GUI is empty.Test case:
add->add->undo->undo->redo(Add 2 students, and then 2 undo with 1 redo)
Expected: The firstaddcommand is redone. The first student is added back to the list of students.
History
Setup
- Close the app and rerun it before starting this test. Do not type any commands (This is to reset command history).
Test cases
- View command history
- Enter:
history
Expected: The command history is shown in the Result Display Box. The command history is empty. - Enter:
list
Expected: The list of students is shown in the student list. The command history is updated to show the commandlist. - Enter:
help
Expected: The help window is shown. The command history is updated to show the commandhelp. - Enter:
history
Expected: The command history is shown in the Result Display Box. The command history showshelpas the most recent command at the top of the list, followed bylistbelow it.
- Enter:
Launching with erroneous data files
Setup
- Move the JAR file to a fresh directory.
- Run and close the app before starting this test. (This is to ensure a fresh
classmanager.jsonandpreferences.json) - Copy the sample data file
classmanager.json. Paste 2 copies of the file in the same directory asclassmanager.json. Rename the copies tocorrupt.jsonandwrong.json.
Test cases
- Handling missing data files.
- Edit the
preferences.jsonto have the entry:
(Ensure that there is no file named"classManagerFilePath" : "data\\missing.json"missing.json)- Launch Class Manager
Expected: Class Manager will be populated with sample students. Class Manager will create a new data file when it is next closed.
- Edit the
- Handling corrupted data files.
- Edit the data file
corrupt.json, by adding or deleting lines of data and resulting in a file that does not match the valid JSON format. - Edit the
preferences.jsonto have the entry:
"classManagerFilePath" : "data\\corrupt.json"- Launch Class Manager
Expected: Class Manager will launch with an empty student list. The app will create a new data file when it is next closed.
- Edit the data file
- Handling valid data files but with the wrong configuration.
- Edit the
preferences.jsonto have the entries:
(Ensure that the"classManagerFilePath" : "data\\wrong.json", "tutorialCount" : 1, "assignmentCount" : 1,tutorialCountandassignmentCountare modified)- Launch the app
Expected: The app will launch with an empty student list. The app will create a new data file when it is next closed.
- Edit the
Toggle colour theme
Toggle colour theme
- Test case:
theme
Expected: The colour theme of the app will be switched. If the current theme is dark, it will be switched to light and vice versa.
- Test case:
Exit the app
Exit the app.
- Test case:
exit
Expected: The app closes, and all data is saved.
- Test case:
Appendix: Planned Enhancements
- The current keywords are case-sensitive. We plan to make keywords not case-sensitive in the future iteration. For example,
addis currently case-sensitive. We will accept keywords such asAddandADDin the future. - Class Numbers are currently limited to tutorials that begin with T. We plan to allow Class Numbers to be any sensible alphanumeric string, such as
R15andSG06. - Clicking on a student in the student list currently highlights the student's card. We plan to disable this interaction as it affects the visibility of the student's contact details and visualised graphs.
- Class Participation is currently limited to being true or false for each tutorial session. We plan to allow Class Participation to be an enum level instead, such as
NONE,MINIMAL,SUFFICIENT,ACTIVE,VERY_ACTIVEetc. to allow for better representation of student's efforts in class. - Users currently can only search for basic student information. We plan to allow users to search based on class information in the future. For example, users can search for students with a certain grade or attendance percentage.
- The lookup command currently does not check for invalid fields. We plan to add field validation to the lookup command in the future.
- All parameters do not support handling long strings (exact length depends on the size of the user's screen) as it might get cut off. We plan to allow users to add values of any length that will not get cut off in the future.
- The name field does not accept special characters such as
\or/. We plan to allow users to add special characters to the name field in the future, so that names such as "Ravi s/o Veegan" will be allowed. - The phone field only accepts numbers and should be at least three digits long. We plan to allow users to have more flexibility to the phone field in the future, such as allowing special characters.
TUTORIAL_INDEXandTUTORIAL_SESSIONhave the same meaning but with different names. We plan to switch every occurrence intoTUTORIAL_INDEXin the future, so that no confusion will be caused.